For those who love hummus as a lot as I do, get able to wow your style buds. This lemon garlic hummus is creamy, tangy, and simply the correct amount of garlicky. It’s excellent for dipping, spreading, and even stirring right into a salad or pasta.
I like how easy it’s. A couple of pantry staples, a high-speed meals processor, and a handful of minutes lead to the most effective hummus recipe I’ve ever made at residence. Bonus: it’s tastier than store-bought hummus, and you’ll jazz it up with no matter toppings you want!

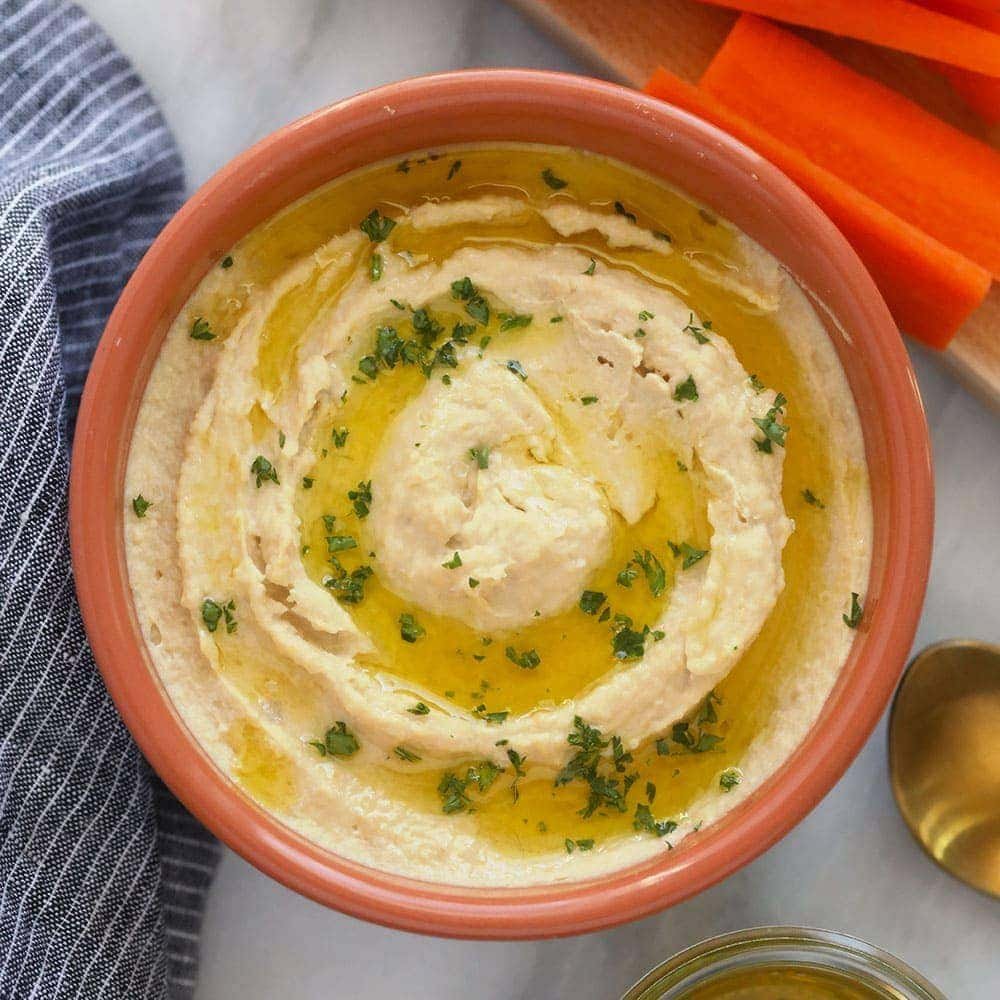
This lemon garlic hummus is easy, quick, and filled with taste:
- Extremely-creamy texture: A high-speed meals processor blends the chickpeas, tahini, and olive oil right into a dreamy hummus.
- Fast and easy: I can have it prepared in simply 5 minutes with minimal effort. It takes extra time to go to the grocery retailer!
- Naturally vegan and gluten-free: Healthful elements make it pleasant for nearly any weight-reduction plan, with bonus vitamins like calcium and potassium.
- Versatile and customizable: This creamy hummus is ideal for dipping, spreading, dolloping, or garnishing with pine nuts or feta cheese.
Key Components
The perfect hummus comes along with only a few easy elements, however each is crucial for taste and texture:
- Chickpeas (garbanzo beans): These are the bottom of any good hummus. I drain and rinse a can of chickpeas to skip the additional time wanted for dried beans.
- Tahini: This sesame paste provides that basic nutty taste. Utilizing unsalted tahini provides full management over the salt degree.
- Olive oil: I take advantage of a good-quality extra-virgin olive oil for a silky texture. It’s what makes the hummus really feel indulgent with out being heavy.
- Garlic: Uncooked garlic provides a shiny, punchy taste, however roasted garlic works fantastically if I need one thing milder and sweeter.
- Lemon juice: Contemporary lemon juice provides a zesty elevate that balances the richness of the tahini and olive oil with some added vitamin C.
- Sea salt: Only a pinch enhances all the flavors with out overpowering them.
- Water: I begin with a bit and add extra as wanted to skinny out the hummus to the right puree.
- Meals processor: A high-speed meals processor will present that {smooth} and creamy texture.

About Tahini
Tahini is a key ingredient in basic hummus. The place did hummus come from? Folks have loved it for hundreds of years throughout Center Japanese and Mediterranean traditions. It additionally has roots in Lebanon, Israel, and Egypt. What began as a easy chickpea and tahini dip has now develop into a staple worldwide.
This creamy sesame paste provides a wealthy, nutty taste and offers the hummus that silky, {smooth} texture I like. It additionally balances the lemon and garlic, making the dip extra rounded and satisfying.
That stated, you can also make hummus with out tahini. I generally swap in plain Greek yogurt for a creamy texture, or almond, cashew, or peanut butter to maintain the nuttiness within the completed dip. Simply remember the fact that tahini is conventional for a motive. For a extra basic hummus, I wouldn’t skip it!
How one can Make This Hummus Recipe
Making home made hummus is simple. Right here’s my step-by-step course of, with a couple of ideas for the creamiest dip:
- Prep the chickpeas. Drain and rinse canned chickpeas. For an additional-smooth hummus, pinch the skins off every chickpea. It’s a bit time-consuming, however the texture is price it.
- Add elements to the meals processor. Place the chickpeas, tahini, garlic, olive oil, lemon juice, salt, and water right into a high-speed meals processor. I like to begin with the minimal quantity of water and add extra as wanted as soon as I’m mixing.
- Mix till {smooth}. Course of on excessive for 1-2 minutes or till the hummus is creamy. Cease sometimes to scrape the edges so every thing blends evenly. Add a bit extra water if it appears too thick.
- Serve or retailer. Serve hummus instantly with toppings like herbs, paprika, or pine nuts, or retailer it in an hermetic container within the fridge for as much as 5 days. I’ve discovered the flavors get even higher after a couple of hours!
Questioning about easy methods to make hummus with no meals processor? For those who don’t have one, a powerful blender works, however be able to cease and scrape down the edges a couple of instances.
This lemon garlic hummus is scrumptious by itself, however there are such a lot of methods to change issues up relying on what you’re within the temper for or what’s within the pantry. I’ve it most frequently with a drizzle of olive oil and chopped parsley or contemporary basil, however listed here are a couple of extra concepts:
- Toppings for aptitude: A sprinkle of paprika, sesame seeds, toasted pine nuts, roasted garlic cloves, or crumbled feta can add layers of taste. I like how feta provides a salty, tangy punch that pairs completely with the lemon and garlic.
- Spice it up: Add a pinch of cayenne, ½ teaspoon floor cumin, sumac, or crimson pepper flakes to present the hummus a spicy or earthy kick. For a bolder taste, mix in a roasted crimson pepper or chipotle pepper.
- Herb additions: Contemporary parsley, cilantro, or dill, stirred in after mixing, brighten the flavour. I generally add a mixture of herbs for a garden-fresh twist.
- Inventive mix-ins: Fold in extras like sun-dried tomatoes, chopped olives, sliced cherry tomatoes, or caramelized onions.
Don’t be afraid to experiment! As soon as a favourite combo clicks, it turns into a go-to hummus taste that’s completely yours.

One of many causes I like this hummus a lot is how versatile it’s. It really works as a dip, an addition to a mezze platter with different appetizers, and even stirred right into a sauce. Listed here are a few of my favourite methods to serve it:
- Basic dipping: There are limitless dipping choices for home made hummus. Heat pita bread, pita chips, crackers, pretzels, cheese, or contemporary veggies like carrots, cucumbers, and bell peppers are all scrumptious.
- Sandwich unfold: Neglect the mayo and mustard and use hummus as a condiment for a sandwich! It provides any sammie wonderful taste and texture.
- Pasta sauce: Hummus is an ideal base for a pasta sauce. Merely fold it into the pasta as a wholesome various to a creamy sauce.
- Bowl topper: Add an enormous scoop to a grain bowl for further taste and plant-based protein. It pairs effectively with my Mediterranean Vegan Buddha Bowl or Butternut Squash Harvest Bowl.
- Dressing improve: Whisk hummus into salad dressing to thicken it up or skinny it out with a bit olive oil and vinegar to make my Herby Hummus Dressing. I like hummus dressing on my Mediterranean Quinoa Salad or Couscous Salad.
- Falafel combo: Hummus and falafel are a match made in heaven. Use it as a dip or unfold it inside a pita with falafel, contemporary veggies, and herbs.
Retailer this hummus in an hermetic container within the fridge for as much as 5 days. If it thickens after chilling, stir in a splash of water to carry it again to that creamy, dippable texture. A fast re-blend can add further smoothness, too.
I don’t suggest freezing hummus, as the feel can develop into grainy or separate as soon as thawed. For those who do freeze it, let it thaw within the fridge in a single day and stir effectively or re-blend earlier than serving.

How can I make my hummus further creamy?
For ultra-creamy hummus, utilizing a high-speed meals processor or high-powered blender makes the most important distinction. Peel the chickpeas earlier than mixing for further creaminess, too. It takes a couple of further minutes, however eradicating the skins noticeably improves the feel.
If hummus nonetheless feels thick, add 1-2 tablespoons of water and mix once more. When you attain the suitable consistency, it ought to be {smooth} and simply dippable.
What does baking soda do when utilizing canned chickpeas?
Baking soda helps break down the outer skins of chickpeas, making them softer and simpler to peel. Simmer them for 10-Quarter-hour with a pinch of baking soda to additional soften them. This works for canned chickpeas as effectively!
Simply make sure you rinse them effectively after simmering to take away any baking soda residue earlier than mixing. It’s not a must-do for this recipe, although.
How do you prepare dinner chickpeas from scratch for hummus?
If I’m beginning with dried chickpeas for my home made hummus recipe, I soak them in a single day in loads of water. The following day, I drain and rinse them, then simmer in contemporary water for about 60-90 minutes, or till they’re very tender. For hummus, softer is healthier.
Why shouldn’t you eat hummus after 7 days?
Selfmade hummus doesn’t comprise preservatives, so it has a shorter shelf life than store-bought variations. After about 5 days within the fridge, the danger of spoilage will increase. Take note of any bitter scent, separation, discoloration, or mildew. Toss it if one thing doesn’t appear proper. It solely takes a couple of minutes to make a contemporary batch!
Place all elements for the hummus right into a high-speed meals processor.
Course of on excessive for 1-2 minutes or till {smooth}.
Optionally available: Add 1-2 extra tablespoons of water, relying on the feel of your hummus. It ought to be {smooth} and simply dippable.
Serve instantly or refrigerate for 3-5 days.
*The quantity of water used depends upon the feel of the hummus. Water thins out the dip, so add extra as wanted.
Serving: 1 /8 recipe, Energy: 328 kcal, Protein: 6 g, Fats: 27 g, Fiber: 5 g, Sugar: 3 g
Diet info is robotically calculated, so ought to solely be used as an approximation.


